Gesture & Conversation Transcriber
GeScript ver. 2.2 (May 06 2005)

(1) First things to do
(2) Basic transcription
(1) Sequential presentation and analysis
(2) Editing the data
(3) Assigning shortcut keys
(4) Continuous transcripting
(5) Step play with audio
(6) Push and pop the current time to make a range
(7) Explore the range of actions with Option key
(1) Adding subtitles to the movie
(2) Adding chapters to the movie
1: Launch QuickTime Player, open the movie to transcribe.
2: Launch GeScript. A new text file with 2 headlines on TextEdit will open automatically.
1: Move on to QuickTime Player. Select a range of the action which you want to describe in your movie.
Drag the control head
on QuickTime Player with shift key, and you'll find a gray zone on the time
line. This is the selected range. If you have Player Pro version, you
can use in / out selection markers to select the range.
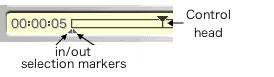
TIPS 1:You can move the selection markers frame by frame with left
/ right cursor on your keyboard.
TIPS 2:When you click the control head and push the cursor
keys with shift key, you can move the markers with the head.
2: Move on to GeScript to find time codes of the selected range in "StartTime" and "EndTime" field. You can refine the exact start and end point to click "<" and ">" buttons under the fields. These buttons shift the selection markers with 1/30 seconds (one frame).

3: Input the sender, the type, and the annotation of the action into each field, or just leave them blank to edit later.
Assigning short cut keys helps you to input the sender and the type (See "Assigning short cut keys").


TIPS:You can use tab as the delimiter in the annotation field. To delimit with tab will help you in future work with MS Excel or other spread sheet application.
Click Write button, or hit return key in "Annotation" field.
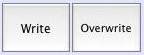
You can find your data on the 3rd line of the text file. The text are editable on TextEdit, but it's easier to use "OverWrite" button instead (see "Editing the text data" below).
4: Repeat 1-3 for transcribing.
5: Move on to TextEdit. Save the text file.
Important! GeScript uses the most front movie on QuickTime Player, and the most front text file on TextEdit. Opening too many movies and text files would cause mismatching between them.
1: Click "+" or "-" button. One of the lines of your data will be loaded. Also a range on your movie will be shift with your data automatically.

2: Click "> / ||" button, or more simply, use the short cut key (Command + return).

3: Repeat 1 and 2 to make sequential presentations or analysis.
1: Click "+" or "-" button on the top to select the line you'd like to edit.
2: To refine the selection range, move "<" or ">" buttons under "StartTime" and "EndTime" fields.
3: You can also rewrite Sender, Type, Annotation.
4: Click "OverWrite" button. The line of the document will be replaced.
1: Edit the line 1 of the text file to find items delimited with a tab. Item 1 is for the abbreviation of sender 1, item 2 is for the abbreviation of the 2, and so on. You can assign 4 abbreviations for senders. Use a tab to delimit items.
2: Item 5 is for the abbreviation of type 1, item 6 is for type 2, and so on. You can assign 4 abbreviations for types. Use a tab to delimit items.
3: Click "Sender Type" button above the fields to assign shortcut keys.
4: Push Command + 1 (or 2, 3, 4) key, and one of the senders is automatically put into "Sender" field. Push command + 5 (or 6, 7, 8) key to put one of the types into "Type "field.
1: Check "Selection Only" button. Check "loop" button if you'd like to loop the movie.

2: On QuickTime Player, move the control head on you movie to the certain point. Then on GeScript, click "+-Ranging" selector to make a instant range. The duration of the range depends on the value you select, from -10 seconds (10 seconds before -> the current time) to 10 seconds(the current time -> 10 seconds after).

3: Type an annotation while you listen. Click "Write" button or hit return key in the annotation field when you have written it.
4: Click ">>" button under "Ranging" selector, or push Command + "]" key to shift the range to the next. If you'd like to shift back, click "<<" button or push Command +"[" key .

5: You can change the speed of the movie while you play it. Drag the rate slider, or push Command + right / left arrow key.

6: Repeat 3-5.
Some researchers play a movie frame by frame with audio to get the exact point of the action start / end. QuickTime Player itself does not support this function, but GeScript does. Push Option + arrow key. Use right arrow key to go ahead, and left arrow key to go back. Use "Ranging" button to make a range from / to the exact point you find.
When you play the movie, you often feel like to remember (push) the current time to use later. You can do this just by click "current" button, or use Option+down arrow key.

You can use this remembered time by select "pop" from "+-Ranging" selector, or use Option+up arrow key.

This will make a range from the time you pushed to the current time. If the current time is smaller than the pushed time, the former will be the start and the latter will be the end of the range.
Using 4 shortcut keys (Option+up, down, right and left arrow key) will make your exploration on the movie more effective.
1: Explore frames using Option+right / left arrow keys.
2: Push the frame of an action start (or end) by Option+down arrow key.
3: Explore another frame using Option+right / left arrow keys.
4: When you find the frame of the action end (or start), pop the previous frame using Option+up key.
Why subtitles?
In conferences, you might find subtitles on movies are very helpful, even for the native audience, because the resonance of large halls often makes utterances on the movies unaudible. Subtitles are also useful to analyze your data. Once you put a subtitle on the exact range of utterances and actions, you can easily revisit them using the appearance of their subtitles.
A good news. You can add multiple text tracks along the
video and the audio tracks with QuickTime Player. It means that you can
add subtitles for actions of each person at the exact timing on your movie, without rather
expensive software (like Final Cut Pro).
See how 3 text tracks (without video, audio) work on QuickTime player.
A bad news is that the procedure is too complicated. Tutorial on Apple site is helpful, but you will soon find too many procedures waiting ahead, like writing a bunch of descriptors, defining time codes with irritating braces and brackets. Getting the time codes of each utterance alone might be enough to exaust you.
Working with GeScript, you can easily get time codes and annotations for actions. Then, why don't you use them to overcome this drawback? GeScript has functions to help it, and here is the procedure.
How to make subtitles with GeScript
1: When you finish your transcription with GeScript, your data file would look like this file.
2: Remember that one text track in a QuickTime movie cannot contain overlapping subtitles. It means that your data should not contain any overlapping between actions.

3: Overlapping actions occur between different senders (participants) or types (modalities). Sort the data by sender and type using "Sort by" selector to divide the data into different texts. After the sorting, just make new document files by click "New" button on the bottom of GeScript, Cut & Paste the lines of different senders or types on TextEdit, and save them. This procedure also helps you to make multiple subtitle tracks by sender and type in future. (Divided text examples: X, Y, and Z).

4: Select the size of "Making subtitles" from "small", "medium", and "large".

5: The program sort your data by start time, and make a subtitle text file automatically
on TextEdit. It contains a bunch of descriptors like this, but just forget them now. Save the file with a certain name.
6: Move to QuickTime Player. Open the subtitle text file (you can open it though it is a text file), and you find a simple subtitle movie with your annotation.
7: Choose "Select All" from "Edit" menu of QuickTime Player, then Copy. Close the movie.
8: Click on the main movie. Select All. Then select "Add Scaled" from the "Edit" menu. This adds the text track to the movie. Make sure it is exactly the right length, and the annotations are exactly along the actions.
9: To fix the position and size of the text track, choose "Get Movie Properties" from "Movie" menu. Select a text track from the left selector. Select "Size" from the right selector. Click "Adjust" and drag the text area appearing on the main movie.
10: Repeat 5-9 to put multiple text tracks on the main movie.
11: If you'd like to refine your text track, you can edit the subtitle text file you made. Apple Tutorial site for "text descriptors" will help you.
TIPS; Change the font type of the 1st character in your data file to create subtitles with your favorite font.


Another good news. Once you made a text track, you can easily add chapters on your movie.
1: Move to QuickTime Player. Choose "Properties" from
"Movie" menu. Select a text track from the left selector. Select "chapter" from
the right selector. Click "Setting a owner track" and select "video track" as a owner track.
2: You'll find a chapter selector aside the slider on the main movie. Now
you can jump to the start or the end of each action with this chapter selector.

| play and pause |
Play and pause the movie |
| rate
slider |
Change
speed of the movie. 1.0 is the normal speed. |
| selection
only |
Play the selection only. |
| loop
|
Keep playing the movie in a loop |

| - |
Move
to the previous line of the text data. |
| + |
Move
to the next line of the text data. |
| Line No. |
The
selected line number of the text data. |
| Write |
Append
data from GeScript to the text file. |
| OverWrite |
Overwrite
the selected line of text file. |
| Ranging |
Make a range in your movie automatically. "-10" means making a range from 10 seconds
before to the current time. "10" means making a range from the current time
to 10 seconds after. If you select "pop", it will make a range between the pushed time and the current time (See detail in Push and Pop the current time) |
| << |
Move the
selected range to the next range with the same duration. |
| >> |
Move the
selected range to the previous range with the same duration. |
| Sort by |
Sort the text file by start time, end time, sender, type, or annotation. |
| Make subtitle |
Make a subtitle text for QuickTime Player. |
